
Docker is a popular set of tools for creating and running applications in containers. Developing an application to run in a container means isolating the application from the underlying system/environment so that the application can be run in any environment. The environment will be injected into the application at runtime.
Docker provides a powerful command-line interface (CLI) to work with containers. In this article, we’ll take a look at the commit command in particular and how we can use it to create a new image from a container.
=Discover how Kosli allows you to follow a source code change to Docker runtime environments
Learn how to track changes with KosliAn Overview of Basic Terms
- Image: An image is a set of files, including the source/binaries and configuration needed for the application to run. An image is read only. We can create one by providing a Dockerfile to the
docker buildcommand. We can also create an image with thecommitcommand from a container. - Container: A container is a version of the image, ready to run as an application. It contains the environment for the application to run (e.g., file systems, environment variables, port mappings, etc.). We can use either the
createorruncommands to create a container from an image.Createwill only create the container, whereasrunwill also start it. A container need not be running once created; it can also be in the stopped state. Thedocker pscommand lists the created containers. - Local repository: Docker keeps a repository of images and containers on the machine where we use the Docker tool to build or run the images. If you need to work with an image not in your local repository, you can use the docker
pullcommand. Some commands, likerun, will automatically do this for you. If we want to save a local image to a remote repository, we can use thepushcommand.
Docker Commit Command
The commit command creates a new image from a container and optionally from specified Dockerfile commands. The syntax of the command is as follows:
docker commit [OPTIONS] CONTAINER [REPOSITORY[:TAG]]
The REPOSITORY is sometimes also called the image name. Tags provide more information about the image, like versioning (1.0, latest, etc.). We can pull and work with images by querying for specific tags.
Caveats
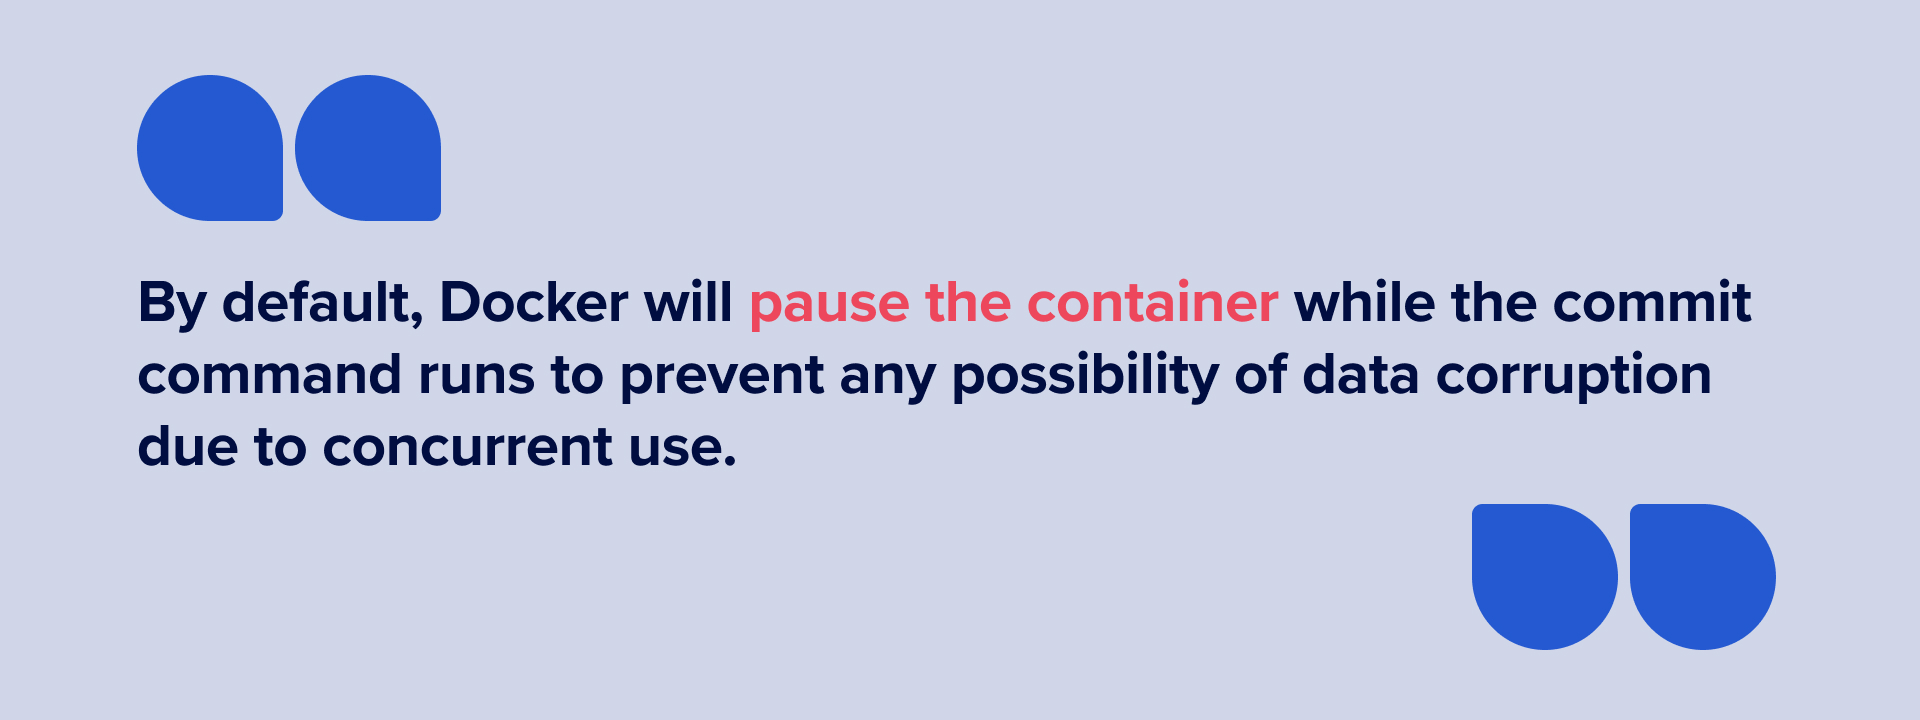
If the image uses volumes, the commit operation will not consider the data contained in those. This is because the data written to volumes will be considered as data created by the application and not part of the application image. (Volumes are the preferred way to persist data generated and used by Docker containers (e.g., saving data to a database or to files). By default, Docker will pause the container while the commit command runs to prevent any possibility of data corruption due to concurrent use. We can override this with the -p flag.
Use Case
Note that the command needs a reference to a container, not an image. (We can use the build command to create a new image from an existing one or from scratch.) Why would we want to create an image from a container? Let’s say we have an application running in a container that isn’t behaving as we expect.
So rather than make changes to the application’s code/config or the Dockerfile, we build a new image and run it. Then we make changes to the files in the container using the exec command and observe the results. Then we may want to share that container with other team members for their input. So we create an image that contains the latest state of the container and share that.
While this is OK for quick testing/debugging, we would eventually want to pick up the changes we made and propagate them to the application’s code/configuration or the Dockerfile used for the build. The diff command is useful in that case so we know which files were changed.
Docker Commit Example
Let’s see an example of using commit. Say we are working with the NGINX image, and the index file needs to be changed to a company-specific one. These changes are not in the image or the Dockerfile used for the build, and we want to do a quick test. So we will make changes to the container itself.
Create and Run the Container
Let’s create and run the container for NGINX with the following:
$ docker run nginx -p 8080:80
We can list the currently running containers with this:
$ docker ps
And with the -a flag, we can list all containers (including the stopped ones too). Check that NGINX is running at localhost:8080. You should see the welcome page of NGINX.
Make Changes
We want to change this index page to a company-specific one. So we enter the Linux shell inside the container with the command below:
$ docker exec -ti <container-id> sh
We can get the container-id from the docker ps command. The above exec command will give us access to the shell prompt. Now we replace the index file with the one we want (using echo here for simplicity):
$ echo "<h1>Welcome to Love and Peace Inc</h1>" > /usr/share/nginx/html/index.html
And we exit the shell with an exit command. We can verify our change by reloading localhost:8080 in the browser. We should see the new content. If we wanted to keep track of what changes we made to the container, we could use the following:
$ docker diff <container-id>
We need to ignore some files that NGINX creates/modifies at runtime (e.g., the ones under /var/cache). We can see that there is a “changed” entry for the index.html that we changed.
C /usr/share/nginx/html/index.html
Create New Image
Now we want to share this container with other team members. So we use the commit command:
$ docker commit <container-id> nginx:new-index-file
Here, we have created a new image with the same repository/image name == nginx, but a different tag, that describes the change we made. We could also have specified an entirely new image name like “test-new-index”. To confirm the image creation, we do this:
$ docker images
We can verify that the new image has the changes by running it and checking localhost:8080. (First, we would need to stop the earlier container, which is also listening on 8080, with docker stop.)
$ docker run nginx:new-index-file -p 8080:80
What if we wanted to inspect the files in the image without first running it as a container and then running an interactive shell in it? The docker save command comes in handy, allowing us to save the image as a tar file, which we can then view with archiving tools like tar or zip.
Command Options
Here are the options for docker commit command.
--author or -a
Specify the author of this commit (e.g., -a "Big Joe <bigjoe@wwf.com>", etc.).
--change or -c
Apply a specified Dockerfile instruction to the created image. So instead of changing the Dockerfile and building and deploying the image, we can create a new image from the container by using these instructions. The supported ones are as follows:
- CMD: This is the command to execute when a Docker container is started. If multiple CMDs are specified, only the latest will be picked up. This can be overridden by the
commandparameter to thecreate/runcommand. - ENTRYPOINT: This is similar to CMD above, except that it cannot be overridden with the command parameter in the
create/runcommand as it appends to the ENTRYPOINT. To override the entrypoint you can use the`--entrypoint`flag on theruncommand. - ENV: Use this to set environment variables in key=value form.
- EXPOSE: Add an “EXPOSE port” command to the Dockerfile. Note that this is only for documentation; the actual port mapping happens using the
-pparameter passed to create or run. - LABEL: This adds metadata to the image (e.g., version=“3.1”.) We can inspect the labels for an image/container using the
inspectcommand. We can also filter images by the label using the-fflag. - ONBUILD: Build instructions that are executed when a new image is built using this image. This is useful when the instructions need to be executed on content that is available in the child’s build (e.g., a reusable compile-and-package image would work on the source code from a child build).
- USER: This specifies the user to use when running the image. A user group may also be specified.
- VOLUME: This creates a mount point at the specified path and marks it as holding an externally mounted volume.
- WORKDIR: This sets the working directory for other commands. It’s useful when we want to execute multiple instructions after switching to another directory.
Below is an example of passing CMD and ENV options to change.
Usage Example
$ docker commit -c "ENV DEBUG=true" -c 'CMD \["nginx" "-g" "daemon off; worker_processes 2"]' nginx:wproc-and-debug
Here, we’ve overridden the CMD of the NGINX image to pass an extra setting of worker_processes=2. Also, we have passed an ENV variable debug=true. Note the use of multiple -c flags to pass multiple changes. We have created an image with a new tag: wproc-and-debug. Note that on Windows, the quotes and escaping will change.
--message or -m
Provide a commit message, describing the changes made, for documentation.
--pause or -p true/false
This denotes whether to pause the container during a commit. It defaults to true.

Conclusion
We have seen how we can use the docker commit command, along with supported options, to create a new image. This is useful in the case of debugging/testing and to share the container state with other team members. Debugging issues in a distributed containerized environment can be challenging. Kosli can help you by tracking your changes and deployments and providing valuable insight into why something is broken.