
The main principle behind Docker and containerization isn’t too difficult to grasp. You put your software and its dependencies inside a “package” and distribute it. Whoever has this package will be able to run the application, and it’s all but guaranteed to behave as expected.
However, actually learning how to work with Docker can feel a little overwhelming. There are countless commands and each of them has many options. This post aims to make your Docker journey easier by taking a deep dive into the docker tag command.
=Discover how Kosli allows you to follow a source code change to Docker runtime environments
Learn how to track changes with KosliRequirements
If you want to follow along with this post there are a few requirements. First, we expect you to be comfortable working with the command line. Second, you need to have Docker installed on your system. Go to the installation page and follow the instructions for your platform if you need to.
You’ll also need an account on Docker Hub. If you don’t have one, go to the sign-up page and create a free account.
We also assume a basic knowledge of Docker!
Docker Tag Fundamentals
First we’ll answer some fundamental questions about tags in Docker.
What Is a Docker Tag?
A tag in Docker is a named reference to a particular version of an image. Go to the page for the official RabbitMQ image. Then click on “tags.” You’ll see several different tags listed:

You can think of tags as a way to distribute several different editions or variations of the same image. For instance, when it comes to the RabbitMQ images, the ones with “-management” use the management plugin, which allows you to access an admin web interface for RabbitMQ. The images without “-management” don’t use the management plugin.
Is Docker Tag immutable?
An important thing to bear in mind about Docker tags is that they’re mutable by design. There’s no guarantee that the same tag name will always refer to the same actual image since new versions of an image can be assigned an existing tag.
For example, the “alpine” tag for rabbitmq is always updated when a new version of rabbitmq is released or when the maintainers decide to use a new Alpine version. While Docker image tags are mutable, Docker images have a content-addressable identifier called a digest which is a sha256 fingerprint that is always guaranteed to be immutable.
What Is the Use of Tags in Docker?
As you’ve seen, you can use tags to identify variations of a Docker image. What you’ll do with this capability ultimately depends on your particular use cases.
Docker tags can be used to identify “editions” of a given image. As you’ve seen with the RabbitMQ examples, there are variants of that image with and without the management plugin, and tags are used to identify those variations.
If you serve your application as a container, you probably have a step on your CI/CD pipeline that uses the docker build command to create an image from a Dockerfile. You probably want to tag each generated image with a version number (or at least a timestamp) to set it apart from previous images.
Docker Tag Examples
We’ll now walk you through some practical examples of how Docker tags work in practice.
What Is the Command to Tag an Image in Docker?
The command to generate a tag in Docker is, you’ve guessed it - docker tag. Let’s see how to use it in more detail. The first thing you’ll need is a Dockerfile. Start by creating a folder and then add a file named Dockerfile inside the folder. Add the following line to it:
FROM nginx:latest
If you have any experience with Dockerfiles, you’ll know that this one is far from being complete. It only declares the base image and stops there. But it doesn’t matter because our goal here is just to have a Dockerfile so we can start playing with tags as soon as possible.
Now, go to your terminal, access the folder where the Dockerfile resides, and run the following command:
$ docker build -t server .
This will create an image called server. You can verify that by running docker images or docker image ls and looking for “server.” It’s even easier if you use grep:
$ docker images | grep server
You’ll see that the image has the tag “latest.” How is this possible if you didn’t specify any tag? Here’s the thing: Docker automatically assigns “latest” when you generate an image without specifying a tag.
Let’s now explicitly tag our image:
$ docker tag server server:v1
Here, we’re using the docker tag command. As a first argument, we pass the image’s current name—the ID would also work. As a second argument, we give the name followed by the new tag.
If you run the docker images command again, you’ll see that there are two images called server:
$ docker images
REPOSITORY      TAG         IMAGE
server          latest      6b6b16340059
server          v1          6b6b16340059
Congrats! You’ve successfully tagged an image in Docker.
How Do I Create a Tag in Docker Hub?
An important component of the Docker ecosystem is the registries. You can think of a Docker registry as an online library or catalog of images. The official Docker registry is Docker Hub, and now you’ll know how to create a tag there.
Technically, you don’t create a tag in Docker Hub. Instead, you tag the image locally and then push it to Docker Hub.
First, you need to be logged into your Docker Hub account. On your terminal type the following:
$ docker login
You’ll then be prompted for your username and password. Though you can provide your password, the more secure option is to use a personal access token instead. Go to docs.docker.com/docker-hub/access-tokens to learn how to create a token. Then go back to the terminal and use the token in place of your password.
After successfully logging in, you’ll be ready to push your image. First, you’ll need to retag your image so it has a fully qualified name composed of repository, name, and tag. In place of the repository, you’ll use your Docker Hub username, like this:
docker tag server
If you run docker images again you’ll see that now there’s yet another image. The next step is to finally send the image to Docker Hub. To do that use the docker push command:
$ docker push <YOUR-USERNAME>/server:v1
This is all you need to do to send your tagged image to Docker Hub.
Docker Tag: A Practical Example
Here’s another example of how tags can be used in practice. You’ll now do the following:
- update your Dockerfile
- generate a new image, also called server, but with a different tag
- push the image to Docker Hub
- use the docker pull command to obtain both images and run them
First, go to the folder where your Dockerfile is located. Create a new file there called index.html and paste the following content in it:
<!DOCTYPE html>
<html lang="en">
<meta charset="UTF-8">
<title>Hello World!</title>
<body>
<h1>Hello World!</h1>
</body>
</html>
Then edit your Dockerfile so it looks like this:
FROM nginx
COPY index.html /usr/share/nginx/html
The HTML file will be copied to the Nginx HTML folder so it can be served when executing the container.
Now build the image again, choosing a different tag:
$ docker build -t <YOUR-USERNAME>/server:v2
The next step is to push the image to Docker Hub.
$ docker push <YOUR-USERNAME>/server:v2
Then remove the images locally:
$ docker rmi <YOUR-USERNAME>/server:v1
$ docker rmi <YOUR-USERNAME>/server:v2
Now you’re going to pull the two images from Docker Hub and spin and run containers out of them. First, do the first image:
$ docker run -it -d --rm -p 80:80 <YOUR-USERNAME>/server:v1
Here, you’re running the image as a container, binding the container to port 80 of the machine. Now, run the second image:
$ docker run -it -d --rm -p 4000:80 <YOUR-USERNAME>/server:v2
This time, you couldn’t use port 80 since it was already bound to the other container. That’s why it uses port 4000.
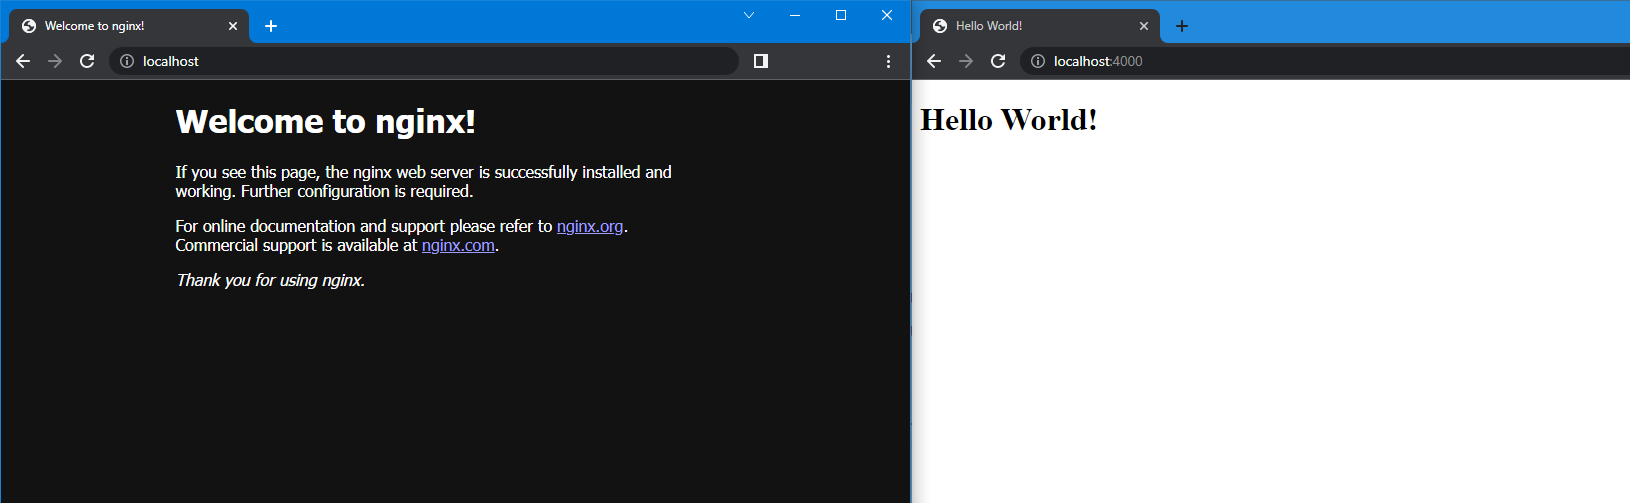
Now you can open two browser tabs, one pointing at HTTP://localhost:80 (though the port here is optional) and the other pointing at HTTP://localhost:4000. The first tab will display Nginx’s default greeting, and the second will show the simple “Hello world” page we created a while ago:
Conclusion
Tagging is an important feature of Docker. It allows you to identify variations or editions of images easily. You can use tags to version the images according to releases of your application. Also, tags are often used to differentiate between images with different capabilities, like the RabbitMQ images you saw earlier.
But tags aren’t a panacea and people often misunderstand them. It’s crucial to remember that a tag can and often does change. The same tag name can be reused to point to a different version of the image, so your workflow can break depending on how you choose to rely on said version of the image.
Unlike tags, digests are immutable references to a given image. If you specify a digest when running a container, you can be sure it won’t change unexpectedly.