

Over the past few years, the DevOps and CloudOps sectors have seen a rise in tools that focus on improving certain operations of teams within the industry. There seems to be a tool for almost any action you could think of, ranging from containerization tools to systems benchmarking, monitoring, and reporting tools.
However, it’s become common for organizations to build their own command line (CLI) tools and programs, as the tools currently available may introduce unnecessary overhead or lack certain critical options. With Golang (Go) being one of the most-used languages for developing these CLI tools, libraries like Cobra make it very easy to start building your own cross-platform CLI tool in a matter of minutes. Cobra provides all you need for your CLI applications with features including support for subcommands, flags (POSIX compliant), command auto completions for various shells, and help pages. It can be used both as a library for your existing application or as a program to generate a boilerplate for CLI applications.
Unfortunately, being able to easily add new options or flags to your CLI application to fine-tune its behavior and output introduces a new problem: In order to achieve the results you need, you may need to use a long line of options and flags. Chaining flags and options can become an error-prone, cumbersome task, so you might need to start reading from your CLI application’s configuration files. You may also need to pass on sensitive values without exposing them in the terminal or shell, especially for security reasons. Other times, values you may want to pass to your tool vary from one environment to another, requiring the use of environment variables.
For all of these problems and use cases, Viper, a Golang library, provides a complete solution for configuration management. It supports a multitude of formats, including environmental variables as well as JSON, TOML, and YAML files, among others.
In this article, you’ll learn how to use Viper for configuration management within your Cobra CLI application/tool. It will walk you through how to set paths from which your application can find configuration files by passing them via the command line. You will see that configurations can be read from both config files and environment variables. Finally, you will learn how to bind these configurations to existing flags in your application so that your configurations achieve the same results as your flags on the command line.
Getting Started
To make it easy for you to follow along with the tutorial, a simple CLI application built with Cobra is provided in this GitHub repository. In this section, you will learn about what this CLI program does, along with the various options and flags you can pass to modify its output.
The provided CLI program allows users to take screenshots of a single web page or a list of web pages and saves them in either a PNG or PDF format.
First, clone the repository by executing the command below in your favorite terminal/shell:
$ git clone https://github.com/rexfordnyrk/webshot.git
To explore the tool, you need to build it from the source code you just downloaded. Run the following command from the webshot project directory:
$ go build
This will build the tool and create an executable file in the root of the project directory. Now you can run the program:
$ ./webshot
This command displays some information on the tool, as pictured in the image below:
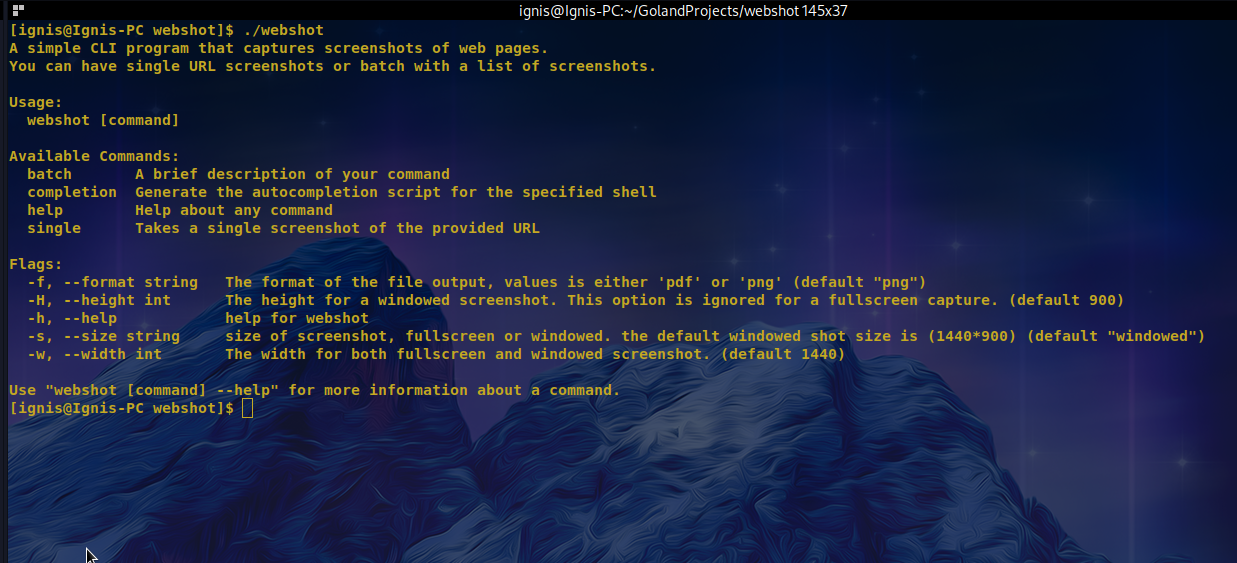
Getting to Know the Tool
Now that you have the initial program built and running, take a moment to try it out.
To take a single screenshot, you can use the single command and provide a required string value—the URL of the page to be captured.
Taking screenshots of multiple URLs at the same time requires you to create a text file (with each URL on a new line) and pass the path to the file as an argument to the batch subcommand.
Screenshots can be full page or window sized, as specified using the --size or -s flag for fullpage or windowed, respectively.
A window-sized screenshot has a default width and height of 1440 x 900. You can pass the flag --width or -w and an integer value to determine the width of the screen in pixels for either fullscreen or windowed screenshots. You can also use the flag --height or -H to determine the height of a windowed screenshot (this option is ignored when running a full screen screenshot).
Finally, you can set the output format as a PNG file or PDF file by passing the flag --format or -f with values of either png or pdf. PNG is the default format if not specified.
Let’s take a look at an example. To take a single windowed screenshot of https://www.kosli.com as a PNG file with the default window size, use the following command:
$ ./webshot single --size=windowed https://www.kosli.com
This creates a file with the .png extension in the current directory, as can be seen in the image below after listing the content of the directory.
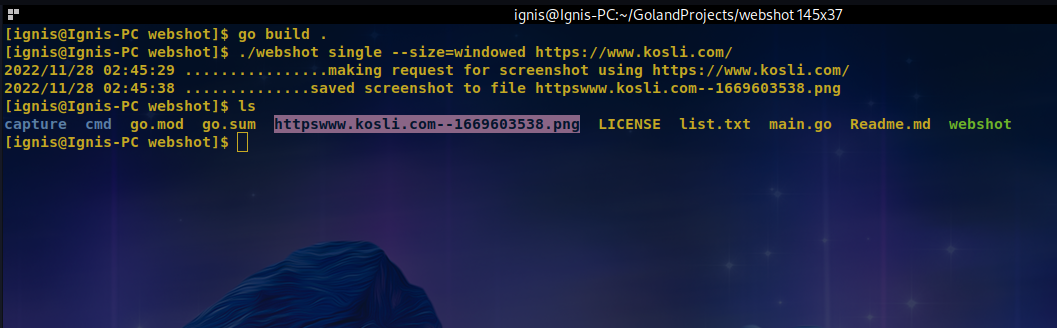
Here’s the screenshot obtained from running the above command:

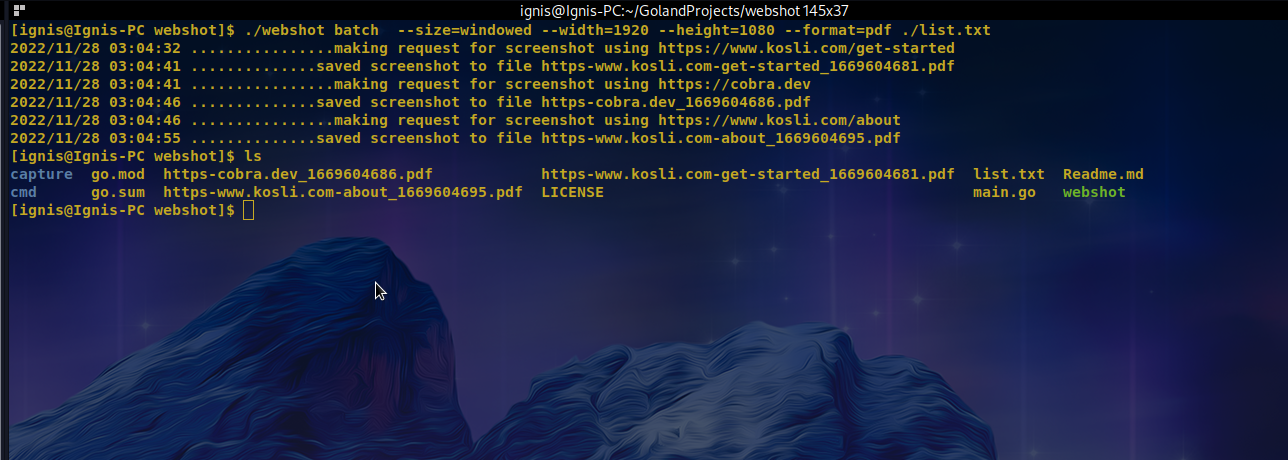
Now consider a more complex example. Here, the program is used to capture a list of different web pages as PDF files into a defined directory. Each is expected to be windowed with specific dimensions, 1920 x 1080 .
$ ./webshot batch --size=windowed --width=1920 --height=1080 --format=pdf ./list.txt
As you can see in the output seen in the image below, three PDF files were created according to the name of the three URLs provided in the list.txt file.
Reading Config Files in the Commands Using Viper
This section covers how to use Viper for configuration management—specifically, how to import configurations from files by passing the file through the command line. Open the cloned webshot project directory in your favorite code editor.
In the cmd/root.go file, you’ll notice that all the flags in the init() function are bound to fields of the struct variable conf. Currently, the values of conf are the default values from the flags, which will change once the user passes values via the command.
Create Your Config File
In order to use a config file with Viper, first you need to decide on its format. Configuration files can be in JSON, YAML, or TOML formats, amongst others.
For this example, you will be importing a JSON config file, webshot.json. Create this file with the following contents in the root of the project directory, or anywhere in your home directory that is accessible to your webshot program:
{
  "size":   "windowed",
  "width":  1440,
  "height": 900,
  "format": "png"
}
The config file above contains values for the various flags for webshot just as in the existing struct variable conf.
Create a Flag for Config Filename
Now you need to create a flag to the webshot application to be able to specify the config file to be loaded by Viper.
To do so, add the following line inside the init() function call in the cmd/root.go file:
...

rootCmd.PersistentFlags().StringP("config", "c","webshot.json", "Specify the config file name to load. It must be in a JSON format")

...
In the line of code above, you are creating a persistent flag, --config or -c, with the default file name being webshot.json.
Create a Flag for Config Directory
Next, you’ll create a flag to specify the directory from which the config file should be searched and loaded by Viper.
Add the following line right beneath the previous one inside the init() call in the cmd/root.go file:
...

rootCmd.PersistentFlags().StringP("configDir", "d",".", "Specify the directory to find the config file to load. Default is the current directory")

...
In the code above, you are creating another flag, --configDir or -d, with a default value of ".", indicating the current working directory.
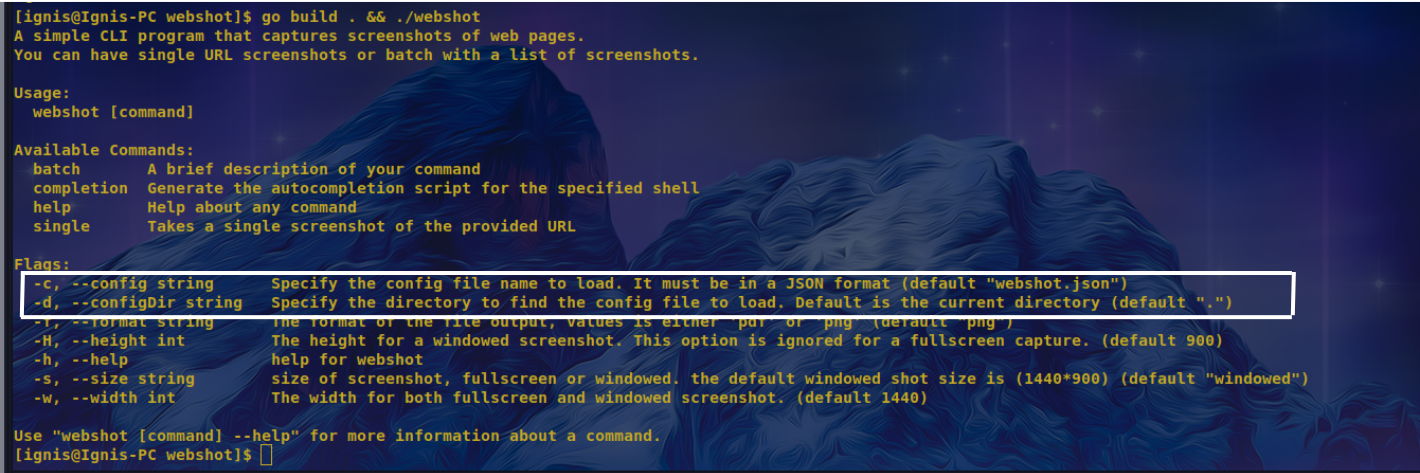
This means that if you build and run the root command, the initial help would show the two new flags, as seen in the screenshot below:
Import the Viper Package
Once you have your config file and flags ready, you need to import the Viper package so you can read the configuration.
First, grab the Viper package with the command below:
$ go get github.com/spf13/viper
Now you can import the Viper package for use in the project. You also need to import the fmt package. In the same cmd/root.go file, add both packages to the import section of the file:
import (
	"fmt"
	"github.com/rexfordnyrk/webshot/capture"
	"github.com/spf13/cobra"
	"log"
	"os"
	"github.com/spf13/viper" //imports the Viper package for use
)
With the package imported, you can now initialize and configure it by adding the function in the snippet below to the bottom of the same file:
func initViperConfig(cmd *cobra.Command) error {
	//initialize Viper
	v := viper.New()

	//specifying the type of configuration file format to be read
	v.SetConfigType("json")

	// name of config file obtained from the --config or -c flag
	v.SetConfigName(cmd.Flags().Lookup("config").Value.String())

	//look for config in the User's Home directory
	v.AddConfigPath(cmd.Flags().Lookup("configDir").Value.String())

	// Find and read the config file
	if err := v.ReadInConfig(); err != nil { // Handle errors reading the config file
		// It doesn't matter if the config file does not exist we will later try ENV variables
		if _, ok := err.(viper.ConfigFileNotFoundError); !ok {
			return err
		}
	}

	//temporarily print loaded Viper config and the working config. Can be commented out if not needed
	fmt.Printf("Viper Config %+v\n",v.AllSettings())
	fmt.Printf("Working config %+v\n", conf)

	return nil
}
In the snippet above, Viper is initialized and configured to know the format of the config file, the name of the file (which is obtained from the --config flag if passed by the user; otherwise, it’s the default value), and the path or directory it is expected to find the config file in (specified by the user using the --configDir flag; otherwise, the current working directory is used as default). Finally, Viper’s ReadInConfig() method is called to attempt to find and read the config file. If there are any errors during the process, aside from the config file not being found, then the error is returned. If the config file is not found, the error is ignored and Viper moves to the next source of configuration: env variables, which will be covered in the next section of this article.
You need to ensure that the initViperConfig() function is called right before any command is executed, for both root and subcommands. You can do this using the PersistentPreRunE() field of the cobra.Command{} definition for the root command:
...

PersistentPreRunE: func(cmd *cobra.Command, args []string) error {
   // PersistencePreRunE on the root command ensures children commands inherit and execute this
   return initViperConfig(cmd)
},

...
At this point, if you need to see that Viper is actually loading the configuration from the config file and directory passed by the newly added flags, you can temporarily assign an empty anonymous function to the Run field for the root command definition, right beneath the PersistentPreRunE field just added above. This addition will look like this:
...

PersistentPreRunE: func(cmd *cobra.Command, args []string) error {
   // PersistencePreRunE on the root command works well
   return initViperConfig(cmd)
},
//can be removed or commented out after testing as it is not needed in this program
Run: func(cmd *cobra.Command, args []string) {
},

...
Now you can build and run just the root command without the options. This will print the entire list of config values read from the default config file and directory, as seen in the command snippet and output below:
$ go build . && ./webshot
You can also pass a different config filename or directory without an existing config file, and you’ll see that Viper returns an empty value set:
$ go build . && ./webshot –config=newfile.json –configDir=~/configs
The output of both instances are pictured in the image below:
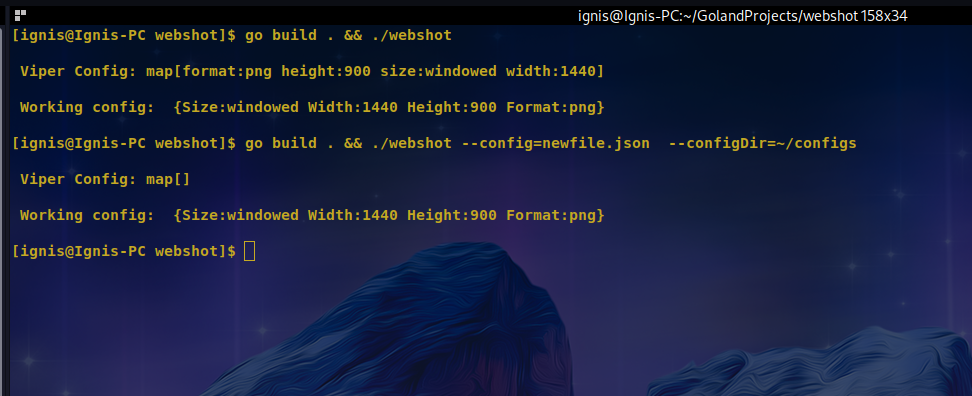
As you can see, the first command printed out the value loaded from the JSON config file you created earlier, using the default path and filename provided to Viper. It also shows the output of the conf variable with the default flag values.
On the other hand, the second run of the command produced an empty config set for Viper because no such config filename existed in the specified directory passed on to Viper. However, you can still see the values of the conf variable. This indicates that even if the config file does not exist, the user can rely on the application defaults.
Retrieving Environment Variable Values in Command Logic Using Viper
In the previous sections, you have seen how to use Viper to read configuration files and how to pass the file name and directory to Viper from the command. Now, you will learn how to read configuration from environmental variables using Viper.
You already have an existing instance of Viper, which you can continue to use because Viper allows you to read configuration from multiple sources using the same instance.
To get this done, you first need to import the strings package by adding it to the block with the list of imported packages at the top of the same file you added the Viper and fmt packages to earlier. The snippet below configures Viper for reading from environmental variables. This should be pasted right before calling fmt.Printf(...) in the initViperConfig() function:
//All environmental variables for config for this program must begin with this prefix
//to avoid conflict
v.SetEnvPrefix("WEBSHOT")

//All config flags must have their equivalent Environmental variable keys with underscores,
v.SetEnvKeyReplacer(strings.NewReplacer("-", "_"))

// Checking for Env. Variables with The defined Prefix
v.AutomaticEnv()
In the code above, Viper is first configured to read environmental variables distinguished with the prefix “WEBSHOT” to avoid conflict in cases where the same variable name is being used by another application.
Next, Viper is configured to ensure that all variables use underscores rather than hyphens by replacing all hyphens with underscores. Fortunately, so far this application does not use any hyphenated flag names or variables.
Finally, Viper’s AutomaticEnv() function is called to scan for all environmental variables that match the current config keys and read their values. That is all you need to get started with reading values from env variables.
Now check to see if configs via Env variables are read by Viper. To do so, you first need to set some environmental variables with values. You can do this from within your terminal by exporting the variable and its value, as seen in the following lines:
$ export WEBSHOT_HEIGHT=250 && export WEBSHOT_WIDTH=1200
This sets two variables: one for height (with a value of 250) and one for width (with a value of 1200). You can now build and run the application without any arguments using the command below, but expect to see the set values read into the Viper config:
$ go build . && ./webshot
Your output should look like this:
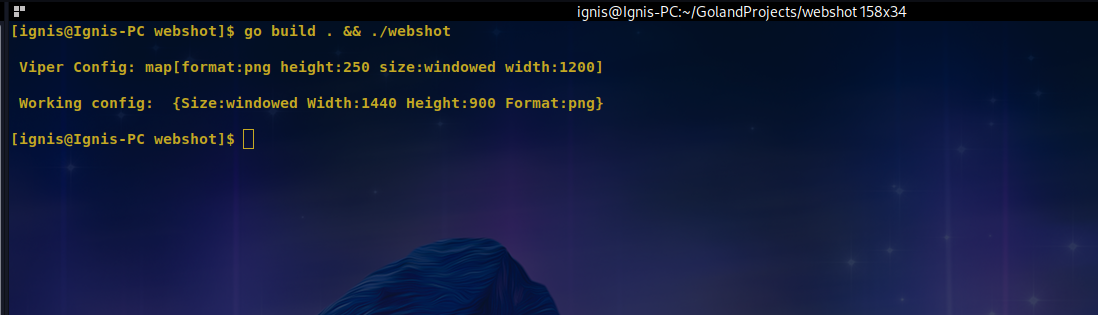
As you can see, Viper read the values of the variable flawlessly. You may also notice that the values of the working config are still not set by the Viper values. You will learn how to fix this in the next section.
Binding Flags Using Viper
At this point, the application is able to read values from the command line using flags, then from config files and environmental variables using Viper, and lastly the default values of the flags. Unfortunately, with the current configuration, even though the value of flags are passed on to Viper, the values that are loaded from the config file or env variables using Viper stay inside Viper and are not automatically passed to the flags. This means that the single and batch commands will still resort to using the default values of the various flags.
In this section, you will be binding the Viper config values to the respective flags such that once they are loaded in Viper, they are also propagated into the flags—thus, the children commands can access them.
To do this, first import the pflag package by adding the following line to the import block at the top of the file:
…
	"github.com/spf13/pflag"
…
Then add the function in the snippet below to the bottom of the cmd/root.go file:
func bindFlags(cmd *cobra.Command, v *viper.Viper) {

	cmd.Flags().VisitAll(func(flag *pflag.Flag) {
		//Get the name of the current config
		configName := flag.Name

		// assign Viper config value to flag when Viper has a value but the flag is unset.
		if !flag.Changed && v.IsSet(configName) {
			confVal := v.Get(configName)
			cmd.Flags().Set(flag.Name, fmt.Sprintf("%v", confVal))
		}
	})
}
The function above loops through all the flags declared so far in the command object. For each iteration, it checks if the flag value was not changed or set via the command and whether Viper has a value for that flag. If Viper has a value, then it is assigned to the flag.
In the same file, right before calling fmt.Printf(...) in the initViperConfig() function, you make a call to the bingFlags() function and pass the cmd and v pointers to it as arguments, as shown below:
// Bind the current command's flags to Viper
bindFlags(cmd, v)
To check if this is working as expected, run the command without any flags or arguments using the command below. This will let Viper load the configuration file in the current directory, and then overwrite the height and width values with the ones from the environmental variables set earlier. Then the Viper values are written to the flag values, overwriting the defaults.
$ go build . && ./webshot
Your output should look like this:

You can see now that both the Viper config and the working config are the same, meaning that Viper and flag config values are now bound.
Since you’re sure your configs are working, you can now comment out or remove all lines of code meant for test or debugging purposes. For now, remove the following snippets and leave the lines printing out the config values so that you can at least see the final values being used to capture the images:
//can be removed or commented out after testing as it is not needed in this program
Run: func(cmd *cobra.Command, args []string) {
},
With that done, you can now build your app again and run a single or batch capture with webshot using any of the configuration options.
For example, you can try taking a single shot with the dimensions of a mobile screen using flags for configuring the width as 412 and the height as 912 with the following command and output:
[ignis@Ignis-PC webshot]$ ./webshot single --width=412 --height=912 https://www.google.com/gmail/about

 Viper Config: map[format:png height:250 size:windowed width:1200]

 Working config:  {Size:windowed Width:412 Height:912 Format:png}

2022/12/01 16:09:44 ................making request for screenshot using https://www.google.com/gmail/about
2022/12/01 16:09:53 ..............saved screenshot to file https-www.google.com-gmail-about_1669910993.png
As you can see, the working config is different from the Viper config because the user-defined values from the command flags take precedence over the environmental variables config in Viper. This is the expected behavior.
Here’s the image that was captured by running the command above:

Conclusion
Trying to build your own CLI application just got easier with Cobra. In this article, you learned how to add flags to your Cobra application to allow for easy modification. You also saw how to pass value to those flags, and through the flags, to other aspects of the application. More specifically, you saw how to pass configuration file names and directories through flags to Viper in the examples provided.
Viper provides you with ways to work with multiple configuration values and their sources. In this article, you saw how to work with both configuration files and environmental variables. You also worked with Viper to understand how it searches for configuration files and reads them according to a specific format configured. In working with env variables, you learned how Viper allows you to differentiate your application’s env variables from conflicting with that of other applications by setting a prefix.
Finally, in order to get configurations from within Viper to be available to the flags of the commands, you learned how to bind config values to the various flags. This way, when values are not provided by the user to the flag, the values contained in Viper will be assigned to the flag. If no values exist from Viper, either through configuration files or env variables, then the flag defaults are used. In other words, your final application should have the following precedence of config order:
- Flags
- Environment variables
- Configuration files
- Default values
You should now be able to implement any of these aspects as needed in your application.